Authentication
This section provides an overview for OneStream authentication for customers in a self-hosted environment.
For customers in a OneStream-hosted environment, see the Identity and Access Management Guide for information about authentication with OneStream IdentityServer.
When users sign in to a OneStream application, they go through an authentication process where they are required to confirm their identity. This is typically done by entering a user ID and password in the OneStream application. The user ID and password could be through an external authentication that is Cloud-based in which OneStream is not storing a user password or through OneStream native users in which this password is stored in the OneStream Framework.
How Does Single Sign-on Work?
-
The OneStream administrator must provision a user to OneStream in the System tab. The Authentication properties of the user indicate whether OneStream should use native authentication or an external single sign-on (SSO) to authenticate the user.
-
Federated single sign-on enables applications to redirect to Azure AD (Microsoft Entra ID), Okta, PingFederate, or your SAML 2.0 provider for user authentication.
-
The user experience during the authentication process is dependent on the configuration of your identity provider. The default experience presents the user with a dialog box to enter the single user ID and password previously configured in an external provider that they may then use to sign in to other corporate applications, hence a single sign-on.
-
Most external authentication providers allow for control over the user experience using techniques such as Integrated Windows Authentication (IWA) or a variant that can eliminate or reduce the need to enter a user ID and password multiple times throughout the day. Consult with your identity provider for information on how to configure this experience.
-
For Azure AD (Microsoft Entra ID), this is referred to as “Pass-Through Authentication.”
-
For Okta, this is referred to as “Okta IWA Web App.”
-
For PingFederate, this is referred to as “PingFederate IWA Integration Kit.”
-
The steps in this section provide information on configuring OneStream for external authentication with Transport Layer Security (TLS) encryption (access to the Web Server using https versus http). For a point of reference, these steps were performed in IIS running on a Windows Server 2016 operating system.
OneStream supports native authentication, authentication with one external identity provider, or both native authentication and one external identity provider.
OneStream supports the following external identity providers:
-
Microsoft Active Directory (MSAD)
-
Lightweight Directory Access Protocol (LDAP)
-
Three OpenID Connect (OIDC) identity providers:
-
Azure Active Directory (Azure AD [Microsoft Entra ID])
-
Okta
-
PingFederate
-
-
SAML 2.0 identity providers (for example, Okta, PingFederate, Active Directory Federation Services [ADFS], and Salesforce)
Set up authentication in the Application Server Configuration and Web Server Configuration in OneStream. This section includes instructions to set up for the following configurations:
Set Up for Native Authentication
-
Open the OneStream Server Configuration Utility application.
-
Go to File > New Application Server Configuration File.
NOTE: Alternatively, you can open an existing file to edit it.
-
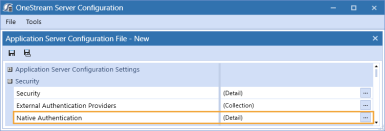
In the Security section, click the ellipsis to the right of Native Authentication.
-
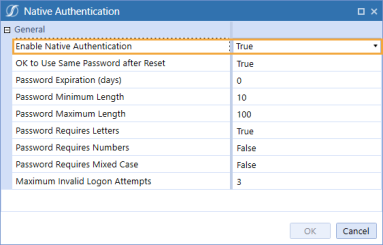
In the Enable Native Authentication drop-down menu, select True.
IMPORTANT: If Enable Native Authentication is set to False, the user will receive an error when attempting to log in to OneStream using native authentication.
-
Click the OK button and save changes.
-
Go to File > New Web Server Configuration File.
NOTE: Alternatively, you can open an existing file to edit it.
-
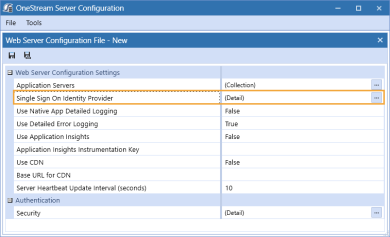
In the Web Server Configuration Settings section, click the ellipsis to the right of Single Sign On Identity Provider.
-
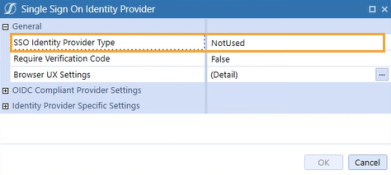
In the General section, in the SSO Identity Provider Type drop-down menu, select NotUsed and then click the OK button.
-
In the Authentication section, click the ellipsis to the right of Security.
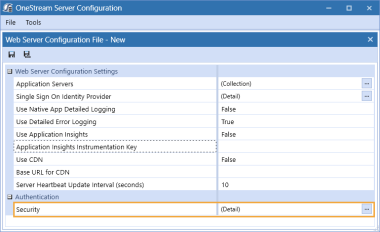
-
In the Display Native Logon with SSO Enabled drop-down menu, select False.
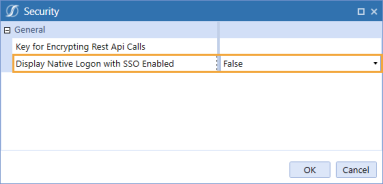
-
Click the OK button.
-
Save changes and reset IIS.
NOTE: Reset IIS after you save any changes to the Application Server Configuration or Web Server Configuration.
Set Up for Single Sign-on with an External Identity Provider
-
Open the OneStream Server Configuration Utility application.
-
Go to File > New Application Server Configuration File.
NOTE: Alternatively, you can open an existing file to edit it.
-
In the Security section, click the ellipsis to the right of Native Authentication.

-
In the Enable Native Authentication drop-down menu, select False.
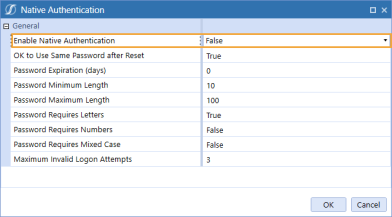
-
Click the OK button and save changes.
-
Go to File > New Web Server Configuration File.
NOTE: Alternatively, you can open an existing file to edit it.
-
In the Web Server Configuration Settings section, click the ellipsis to the right of Single Sign On Identity Provider.

-
In the General section, in the SSO Identity Provider Type drop-down menu, select the type of external identity provider: Azure, Okta, PingFederate, Saml, or OpenId. Click the OK button.
-
In the Authentication section, click the ellipsis to the right of Security.

-
In the Display Native Logon with SSO Enabled drop-down menu, select False.

-
Click the OK button.
-
Save changes and reset IIS.
NOTE: Reset IIS after you save any changes to the Application Server Configuration or Web Server Configuration.
Single sign-on with an external identity provider can be configured to require a one-time verification code for authentication. See Verification Code.
Set Up for Native Authentication and Single Sign-on with an External Identity Provider
-
Open the OneStream Server Configuration Utility application.
-
Go to File > New Application Server Configuration File.
NOTE: Alternatively, you can open an existing file to edit it.
-
In the Security section, click the ellipsis to the right of Native Authentication.

-
In the Enable Native Authentication drop-down menu, select True.
IMPORTANT: If Enable Native Authentication is set to False, the user will receive an error when attempting to log in to OneStream using native authentication.

-
Click the OK button and save changes.
-
Go to File > New Web Server Configuration File.
NOTE: Alternatively, you can open an existing file to edit it.
-
In the Web Server Configuration Settings section, click the ellipsis to the right of Single Sign On Identity Provider.

-
In the General section, in the SSO Identity Provider Type drop-down menu, select the type of external identity provider: Azure, Okta, PingFederate, Saml, or OpenId. Click the OK button.
-
In the Authentication section, click the ellipsis to the right of Security.

-
In the Display Native Logon with SSO Enabled drop-down menu, select True.
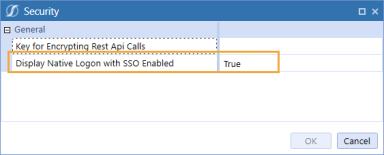
-
Click the OK button.
-
Save changes and reset IIS.
NOTE: Reset IIS after you save any changes to the Application Server Configuration or Web Server Configuration.
Single sign-on with an external identity provider can be configured to require a one-time verification code for authentication. See Verification Code.
This section includes instructions for configuring the following types of authentication:
Native Authentication Configuration
To enable native authentication, follow these steps:
-
Set Up for Native Authentication or Set Up for Native Authentication and Single Sign-on with an External Identity Provider.
Set Up OneStream Login with Native Authentication
-
In the OneStream desktop application, go to System > Security > Users > <user>.
-
In the Authentication section, complete the following fields for native authentication.
-
External Authentication Provider: In the drop-down menu, select (Not Used).
-
External Provider User Name: Leave this field blank.
-
Internal Provider Password: Enter a password.

-
-
Click the Save icon.
Log in to OneStream with Native Authentication
- On the desktop application Logon screen, for Server Address, specify the URL or a client connection.
- Click the Connect button.
- Enter your user profile name and internal provider password.
-
Click the Logon button.
-
Select an application from the drop-down menu.
-
Click the Open Application button.
NOTE: To log off, on any screen, click the Logoff icon and then click the End Session button.
MSAD Configuration
To enable single sign-on with MSAD, follow these steps:
-
Set Up for Native Authentication or Set Up for Native Authentication and Single Sign-on with an External Identity Provider.
Set Up the Application Server Configuration in OneStream
-
Open the OneStream Server Configuration Utility application.
-
Go to File > New Application Server Configuration File.
NOTE: Alternatively, you can open an existing file to edit it.
-
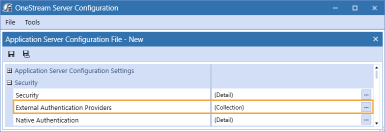
In the Security section, click the ellipsis to the right of External Authentication Providers.
-
Click the + icon to add an item.
-
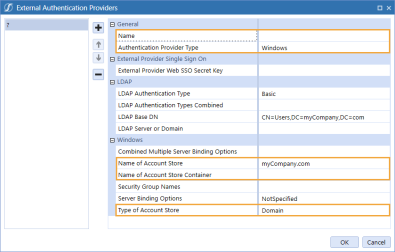
In the General and Windows sections, complete the following fields:
-
Name: Enter the name of the identity provider. This name will display when configuring users to their external SSO.
-
Authentication Provider Type: Select Windows in the drop-down menu.
-
Name of Account Store: Enter the domain name of the active directory.
TIP: In Active Directory Users and Computers, you can view the domain name of the active directory.
-
Name of Account Store Container: Enter the name of the domain controller (DC). Leave the other values as default.
TIP: In Active Directory Users and Computers, under the active directory, click Domain Controllers to view the name of the domain controller.
-
Type of Account Store: Select Domain in the drop-down menu.
-
-
Click the OK button.
-
Save changes and reset IIS.
NOTE: Reset IIS after you save any changes to the Application Server Configuration or Web Server Configuration.
Set Up the Web Server Configuration in OneStream
-
Open the OneStream Server Configuration Utility application.
-
Go to File > New Web Server Configuration File.
NOTE: Alternatively, you can open an existing file to edit it.
-
In the Web Server Configuration Settings section, click the ellipsis to the right of Single Sign On Identity Provider.

-
In the SSO Identity Provider Type drop-down menu, select NotUsed.

-
Click the OK button.
-
Save changes and reset IIS.
NOTE: Reset IIS after you save any changes to the Application Server Configuration or Web Server Configuration.
Set Up OneStream Login with MSAD
-
In the desktop application, go to System > Security > Users > <user>.
-
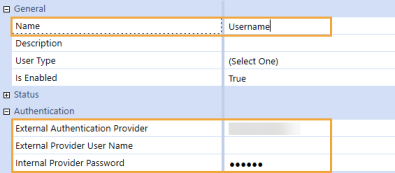
In the General and Authentication properties, complete the following fields for MSAD authentication.
-
Name: Enter the user logon name listed in active directory.
TIP: In Active Directory Users and Computers, under the active directory, click Users to view the list of users. Select the user. Click the Account tab to view the user logon name.
-
External Authentication Provider: In the drop-down menu, select the MSAD configuration.
-
External Provider User Name: Leave this field blank.
-
-
Click the Save icon.
Log in to OneStream with MSAD
- On the desktop application Logon screen, for Server Address, specify the URL or a client connection.
- Click the Connect button.
- Enter your user name and password set up in MSAD.
-
Click the Logon button.
-
Select an application from the drop-down menu.
-
Click the Open Application button.
NOTE: To log off, on any screen, click the Logoff icon and then click the End Session button.
LDAP Configuration
To enable single sign-on with LDAP, follow these steps:
-
Set Up for Native Authentication or Set Up for Native Authentication and Single Sign-on with an External Identity Provider.
Set Up the Application Server Configuration in OneStream
-
Open the OneStream Server Configuration Utility application.
-
Go to File > New Application Server Configuration File.
NOTE: Alternatively, you can open an existing file to edit it.
-
In the Security section, click the ellipsis to the right of External Authentication Providers.

-
Click the + icon to add an item.
-
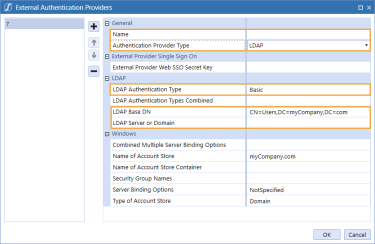
In the General and LDAP sections, complete the following fields:
-
Name: Enter the name of the identity provider. This name will display when configuring users to their external SSO.
-
Authentication Provider Type: Select LDAP in the drop-down menu.
-
LDAP Authentication Type: Select Basic in the drop-down menu.
-
LDAP Base DN: Enter the distinguished name (DN) of the container or organizational unit where your OneStream users' accounts are located.
TIP: The base DN is the full path to the location of the user accounts in the authentication hierarchy. LDAP will look for user accounts in this location. If needed, contact your IT Support for this information.
-
LDAP Server or Domain: Enter the fully qualified domain name (FQDN) of your active directory domain or domain controller.
-
-
Click the OK button.
-
Save changes and reset IIS.
NOTE: Reset IIS after you save any changes to the Application Server Configuration or Web Server Configuration.
Set Up the Web Server Configuration in OneStream
-
Open the OneStream Server Configuration Utility application.
-
Go to File > New Web Server Configuration File.
NOTE: Alternatively, you can open an existing file to edit it.
-
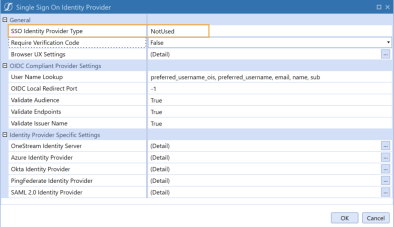
In the Web Server Configuration Settings section, click the ellipsis to the right of Single Sign On Identity Provider.

-
In the SSO Identity Provider Type drop-down menu, select NotUsed.
-
Click the OK button.
-
Save changes and reset IIS.
NOTE: Reset IIS after you save any changes to the Application Server Configuration or Web Server Configuration.
Set Up OneStream Login with LDAP
-
In the desktop application, go to System > Security > Users > <user>.
-
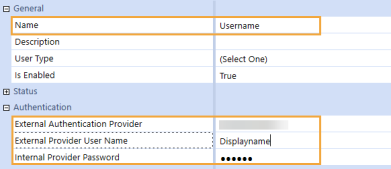
In the General and Authentication properties, complete the following fields for LDAP authentication:
-
Name: Enter the user logon name listed in active directory.
TIP: In Active Directory Users and Computers, under the active directory, click Users to view the list of users. Select the user. Click the Account tab to view the user logon name.
-
External Authentication Provider: In the drop-down menu, select the LDAP configuration.
-
External Provider User Name: Enter the display name listed in the active directory.
TIP: In Active Directory Users and Computers, under the active directory, click Users to view the list of users. Select the user. Click the General tab to view the display name.
-
-
Click the Save icon.
Log in to OneStream with LDAP
- On the desktop application Logon screen, for Server Address, specify the URL or a client connection.
- Click the Connect button.
- Enter your user name (user logon name) and password set up in the active directory.
-
Click the Logon button.
-
Select an application from the drop-down menu.
-
Click the Open Application button.
NOTE: To log off, on any screen, click the Logoff icon and then click the End Session button.
Microsoft Azure AD (Microsoft Entra ID) Configuration
To enable single sign-on with Azure AD (Microsoft Entra ID) for the OneStream Desktop application, which includes the Windows Client application and the Excel Add-In, using OIDC protocol, follow these steps:
-
Set Up for Single Sign-on with an External Identity Provider or Set Up for Native Authentication and Single Sign-on with an External Identity Provider.
To configure OneStream REST API to support Azure AD (Microsoft Entra ID) authentication, see the REST API Implementation Guide.
Set Up the Application in Azure AD (Microsoft Entra ID)
To set up the application in Azure AD (Microsoft Entra ID), you must copy the application (client) ID and tenant ID (directory ID) from Azure AD (Microsoft Entra ID) and paste them into the Web Server Configuration in OneStream. Also, enter the redirect URI in Azure AD (Microsoft Entra ID) in this format: https://<domainname>/OneStreamWeb/OneStreamLogonCallback.aspx
-
Log in to your Azure AD account.
-
On the Home screen, click the App registrations icon.
-
On the App registrations page, click the + New registration tab.
-
On the Register an application page, complete the following fields:
-
Enter a name for the application.
-
For Supported account types, select Accounts in this organizational directory only.
-
For Redirect URI, select Public client/native.
-
-
Click the Register button.
-
On the page for the application, click Add a Redirect URI.
-
On the Authentication page, click the + Add a platform button.
-
In the Configure platforms section to the right, select the Mobile and desktop applications icon.
-
In the Custom redirect URIs field, enter the redirect URI in this format: https://<domainname>/OneStreamWeb/OneStreamLogonCallback.aspx
-
Click the Configure button.
TIP: Return to the App registrations page in Azure AD and then select the application to access information needed for the Web Server Configuration in OneStream: application (client) ID, directory (tenant) ID, and redirect URI.
Set Up the Application Server Configuration in OneStream
-
Open the OneStream Server Configuration Utility application.
-
Go to File > New Application Server Configuration File.
NOTE: Alternatively, you can open an existing file to edit it.
-
In the Security section, click the ellipsis to the right of External Authentication Providers.

-
Click the + icon to add an item.
-
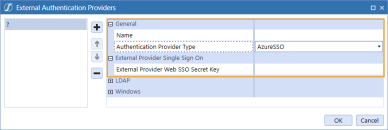
In the General and External Provider Single Sign On sections, complete the following fields:
-
Name: Enter the name of the identity provider. This name will display when configuring users to their external SSO.
-
Authentication Provider Type: Select AzureSSO in the drop-down menu.
-
External Provider Web SSO Secret Key: Enter a unique value. This key is used in the OneStream Application Server Configuration and the OneStream Web Server Configuration. It enables your application server to communicate with the web server.
-
-
Click the OK button.
-
Save changes and reset IIS.
NOTE: Reset IIS after you save any changes to the Application Server Configuration or Web Server Configuration.
Set Up the Web Server Configuration in OneStream
-
Open the OneStream Server Configuration Utility application.
-
Go to File > New Web Server Configuration File.
NOTE: Alternatively, you can open an existing file to edit it.
-
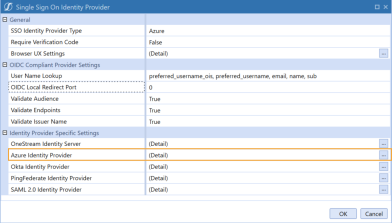
In the Web Server Configuration Settings section, click the ellipsis to the right of Single Sign On Identity Provider.

-
Click the ellipsis to the right of Azure Identity Provider.
-
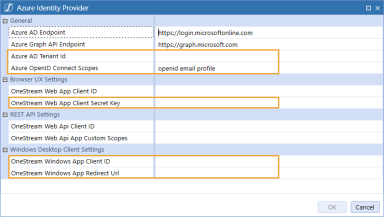
In the Azure Identity Provider dialog box, in the General, Browser UX Settings, and Windows Desktop Client Settings sections, complete the following fields:
-
Azure AD Tenant Id: Enter the directory (tenant) ID from Azure AD.
TIP: To view the directory (tenant) ID in Azure AD, go to the page for the application and select Overview in the list on the left.
-
Azure OpenID Connect Scopes: Enter scopes, or leave as default (openid email profile).
-
OneStream Web App Client Secret Key: Enter the same value from the External Provider Web SSO Secret Key field in the Application Server Configuration.
-
OneStream Windows App Client ID: Enter the application (client) ID from Azure AD. See Set Up the Application in Azure AD (Microsoft Entra ID) step 10.
-
OneStream Windows App Redirect Url: Enter the value you entered in Azure AD as the redirect URI. See Set Up the Application in Azure AD (Microsoft Entra ID) step 10. Use this format: https://<domainname>/OneStreamWeb/OneStreamLogonCallback.aspx
IMPORTANT: The redirect URI entered in Azure AD and in the OneStream Windows App Redirect Url field must match exactly, including capitalization.
-
-
Click the OK button.
-
Save changes and reset IIS.
NOTE: Reset IIS after you save any changes to the Application Server Configuration or Web Server Configuration.
Set Up OneStream Login with Azure AD (Microsoft Entra ID)
-
In the desktop application, go to System > Security > Users > <user>.
-
In the Authentication properties, complete the following fields for authentication through Azure AD.
-
External Authentication Provider: In the drop-down menu, select the Azure AD configuration.
-
External Provider User Name: Enter the username configured in Azure AD. This name must match the username set up in Azure AD and be used by only one user.

-
-
Click the Save icon.
Log in to OneStream with Azure AD (Microsoft Entra ID)
-
On the desktop application Logon screen, for Server Address, specify the URL or a client connection.
-
Click the Connect button.
-
Click the External Provider Sign In button.
-
Enter your Azure AD login credentials.
NOTE: If the Require Verification Code setting in the Web Server Configuration File is enabled, you will be provided with a one-time verification code to enter in the application. See Verification Code.
-
Select an application from the drop-down menu.
-
Click the Open Application button.
NOTE: To log off, on any screen, click the Logoff icon and then click the End Session button.
Okta Configuration
To enable single sign-on with Okta for the OneStream Desktop application, which includes the Windows Client application and the Excel Add-In, using OIDC protocol, follow these steps:
-
Set Up for Single Sign-on with an External Identity Provider or Set Up for Native Authentication and Single Sign-on with an External Identity Provider.
To configure OneStream REST API to support Okta authentication, see the REST API Implementation Guide.
Set Up the Application Server Configuration in OneStream
-
Open the OneStream Server Configuration Utility application.
-
Go to File > New Application Server Configuration File.
NOTE: Alternatively, you can open an existing file to edit it.
-
In the Security section, click the ellipsis to the right of External Authentication Providers.

-
Click the + icon to add an item.
-
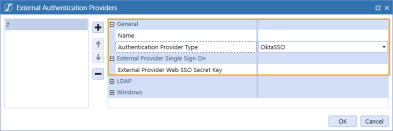
In the General and External Provider Single Sign On sections, complete the following fields:
-
Name: Enter the name of the identity provider. This name will display when configuring users to their external SSO.
-
Authentication Provider Type: Select Okta SSO in the drop-down menu.
-
External Provider Web SSO Secret Key: Enter a unique value. This key is used in the OneStream Application Server Configuration and the OneStream Web Server Configuration. It enables your application server to communicate with the web server.
-
-
Click the OK button.
-
Save changes and reset IIS.
NOTE: Reset IIS after you save any changes to the Application Server Configuration or Web Server Configuration.
Set Up the Application in Okta
To set up the application in Okta, you must copy the client ID from Okta and paste it into the Web Server Configuration in OneStream. Also, enter the redirect URI in Okta in this format: https://<domainname>/OneStreamWeb/OneStreamLogonCallback.aspx
-
Log in to your Okta account.
-
In the Applications list on the left, select Applications.
-
Click Create App Integration.
-
In the Create a new app integration dialog box, for Sign-in method, select OIDC - OpenID Connect.
-
For Application type, select Native Application.
-
Click the Next button.
-
On the New Native App Integration page, complete the following fields:
-
App integration name: Enter the name of the application in Okta.
-
Grant type: Select Authorization Code and Refresh Token.
-
Sign-in redirect URIs: Enter the sign-in redirect URI in this format: https://<domainname>/OneStreamWeb/OneStreamLogonCallback.aspx
-
Sign-out redirect URIs: Click X to clear the field.
-
Controlled access: Select the access option for the application.
-
-
Click the Save button.
-
Copy the client ID. You will need to paste this into the Web Server Configuration in OneStream.
Set Up the Web Server Configuration in OneStream
-
Open the OneStream Server Configuration Utility application.
-
Go to File > New Web Server Configuration File.
NOTE: Alternatively, you can open an existing file to edit it.
-
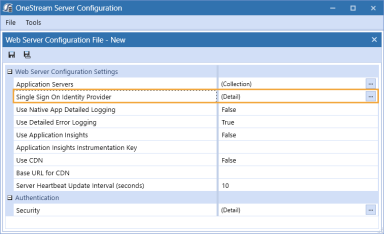
In the Web Server Configuration Settings section, click the ellipsis to the right of Single Sign On Identity Provider.
-
Click the ellipsis to the right of Okta Identity Provider.

-
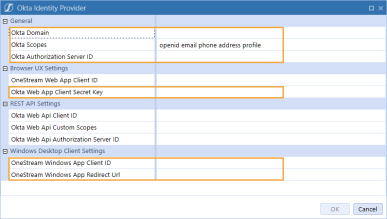
In the Okta Identity Provider dialog box, in the General, Browser UX Settings, and Windows Desktop Client Settings sections, complete the following fields:
-
Okta Domain: Enter the domain from the Okta page URL.
-
Okta Scopes: Enter scopes, or leave as default (openid email phone address profile).
-
Okta Authorization Server ID: Leave as default (blank).
-
Okta Web App Client Secret Key: Enter the same value from the External Provider Web SSO Secret Key field in the Application Server Configuration.
-
OneStream Windows App Client ID: Enter the client ID from the Okta application. See Set Up the Application in Okta step 9.
-
OneStream Windows App Redirect Url: Enter the value you entered in Okta as the sign-in redirect URI. See Set Up the Application in Okta step 7. Use this format: https://<domainname>/OneStreamWeb/OneStreamLogonCallback.aspx
IMPORTANT: The sign-in redirect URI entered in Okta and in the OneStream Windows App Redirect Url field must match exactly, including capitalization.
-
-
Click the OK button.
-
Save changes and reset IIS.
NOTE: Reset IIS after you save any changes to the Application Server Configuration or Web Server Configuration.
Set Up OneStream Login with Okta
-
In the desktop application, go to System > Security > Users > <user>.
-
In the Authentication properties, configure the user to authenticate through Okta.
-
External Authentication Provider: In the drop-down menu, select the Okta configuration.
-
External Provider User Name: Enter the username configured in Okta. This name must match the username set up in Okta and be used by only one user.

-
-
Click the Save icon.
Log in to OneStream with Okta
-
On the desktop application Logon screen, for Server Address, specify the URL or a client connection.
-
Click the Connect button.
-
Click the External Provider Sign In button.
-
Enter your Okta login credentials.
NOTE: If the Require Verification Code setting in the Web Server Configuration File is enabled, you will be provided with a one-time verification code to enter in the application. See Verification Code.
-
Select an application from the drop-down menu.
-
Click the Open Application button.
NOTE: To log off, on any screen, click the Logoff icon and then click the End Session button.
PingFederate Configuration
First, install and configure PingFederate. See Appendix: Installing and Configuring PingFederate.
To enable single sign-on with PingFederate for the OneStream Desktop application, which includes the Windows Client application and the Excel Add-In, using OIDC protocol, follow these steps:
-
Set Up for Single Sign-on with an External Identity Provider or Set Up for Native Authentication and Single Sign-on with an External Identity Provider.
To configure OneStream REST API to support PingFederate authentication, see the REST API Implementation Guide.
Set Up the Application in PingFederate
To set up the application in PingFederate, you must enter the same client ID in PingFederate and the Web Server Configuration in OneStream. Also, enter the redirect URI in PingFederate in this format: https://<domainname>/OneStreamWeb/OneStreamLogonCallback.aspx
-
Log in to your PingFederate account.
-
In the menu on the left, click OAuth Server.
-
Under the CLIENTS list, click the Create New button.
-
On the Client page, complete the following fields:
-
CLIENT ID: Enter a client ID, which is a unique name or identifier for the application registration.
-
NAME: Enter the name of the client.
-
REDIRECT URIS: Enter the redirect URI in this format: https://<domainname>/OneStreamWeb/OneStreamLogonCallback.aspx and then click the Add button.
-
ALLOWED GRANT TYPES: Select Authorization Code and Refresh Token.
-
REQUIRE PROOF KEY FOR CODE EXCHANGE (PKCE): Select this option.
-
-
Click the Save button.
Set Up the Application Server Configuration in OneStream
-
Open the OneStream Server Configuration Utility application.
-
Go to File > New Application Server Configuration File.
NOTE: Alternatively, you can open an existing file to edit it.
-
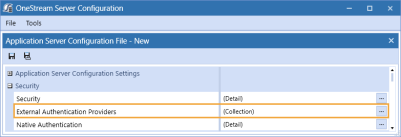
In the Security section, click the ellipsis to the right of External Authentication Providers.
-
Click the + icon to add an item.
-
In the General and External Provider Single Sign On sections, complete the following fields:
-
Name: Enter the name of the identity provider. This name will display when configuring users to their external SSO.
-
Authentication Provider Type: Select PingFederateSSO in the drop-down menu.
-
External Provider Web SSO Secret Key: Enter a unique value. This key is used in the OneStream Application Server Configuration and the OneStream Web Server Configuration. It enables your application server to communicate with the web server.

-
-
Click the OK button.
-
Save changes and reset IIS.
NOTE: Reset IIS after you save any changes to the Application Server Configuration or Web Server Configuration.
Set Up the Web Server Configuration in OneStream
-
Open the OneStream Server Configuration Utility application.
-
Go to File > New Web Server Configuration File.
NOTE: Alternatively, you can open an existing file to edit it.
-
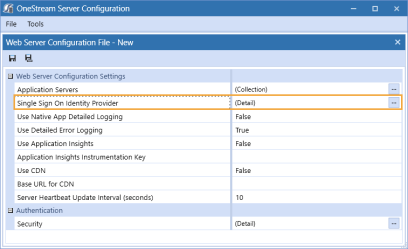
In the Web Server Configuration Settings section, click the ellipsis to the right of Single Sign On Identity Provider.
-
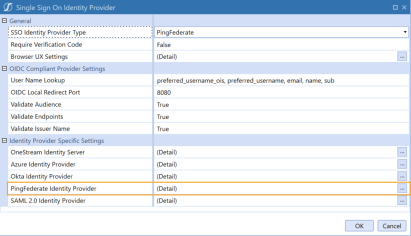
Click the ellipsis to the right of PingFederate Identity Provider.
-
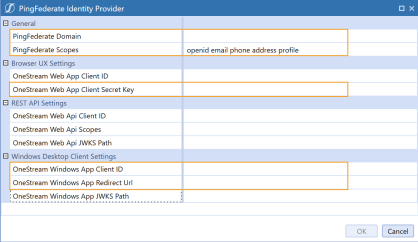
In the PingFederate Identity Provider dialog box, in the General, Browser UX Settings, and Windows Desktop Client Settings sections, complete the following fields:
-
PingFederate Domain: Enter the PingFederate domain. If needed, request this value from your IT Support.
-
PingFederate Scopes: Enter scopes, or leave as default (openid email phone address profile).
-
OneStream Web App Client Secret Key: Enter the same value from the External Provider Web SSO Secret Key field in the Application Server Configuration.
-
OneStream Windows App Client ID: Enter the client ID you entered in PingFederate. See Set Up the Application in PingFederate step 4.
-
OneStream Windows App Redirect Url: Enter the value you entered in PingFederate as the redirect URI. See Set Up the Application in PingFederate step 4. Use this format: https://<domainname>/OneStreamWeb/OneStreamLogonCallback.aspx
IMPORTANT: The redirect URI entered in PingFederate and in the OneStream Windows App Redirect Url field must match exactly, including capitalization.
-
-
Click the OK button.
-
Save changes and reset IIS.
NOTE: Reset IIS after you save any changes to the Application Server Configuration or Web Server Configuration.
Set Up OneStream Login with PingFederate
-
In the desktop application, go to System > Security > Users > <user>.
-
In the Authentication properties, configure the user to authenticate through PingFederate.
-
External Authentication Provider: In the drop-down menu, select the PingFederate configuration.
-
External Provider User Name: Enter the username configured in PingFederate. This name must match the username set up in PingFederate and be used by only one user.

-
-
Click the Save icon.
Log in to OneStream with PingFederate
-
On the desktop application Logon screen, for Server Address, specify the URL or a client connection.
-
Click the Connect button.
-
Click the External Provider Sign In button.
-
Enter your PingFederate login credentials.
NOTE: If the Require Verification Code setting in the Web Server Configuration File is enabled, you will be provided with a one-time verification code to enter in the application. See Verification Code.
-
Select an application from the drop-down menu.
-
Click the Open Application button.
NOTE: To log off, on any screen, click the Logoff icon and then click the End Session button.